WxWidgets Cross Platform Desktop Application Programming with CodeLite IDE
WxWidgets is the best framework to create desktop application that works on various OS.
One of the best open source example is KiCad PCB design software that uses wxWidgets as the graphical user interface (GUI). It works good on Linux and Windows as well with single code base. You can study its source code and learn a lot from how to create cross platform applications.
CodeLite IDE Installation
CodeLite is excellent way to start developing WxWidgets applications as it includes wxCrafter plugin that allows to create Point and Click GUI elements.
Installation on Mint/Ubuntu/Debian
Enter following commands one by one, You can then access from Menu. This instructions are for Mint 21 or Ubuntu 22.04, for other versions use this instructions
sudo apt-key adv --fetch-keys http://repos.codelite.org/CodeLite.asc
sudo apt-add-repository 'deb https://repos.codelite.org/ubuntu/ jammy universe'
sudo apt update
sudo apt install codelite
About wxCrafter
wxCrafter is a RAD plugin for developing wxWidgets UI applications. You should have a basic knowledge of wxWidgets. In this tutorial, we will create a simple wxDialog with a “Hello World” button and connect an event to it.
Hello World
- Create an empty workspace from
File→New→New Workspace - Select
C++ - Set the workspace path and name and click
Ok - Right click on the workspace and select
New→New Project - Set the project category to
GUI - Set the project name
wxCrafterDemo - Set the project type to
wxWidgets GUI Application (wxFrame using wxCrafter) - Click
Ok - Right click on the newly added project, open the settings dialog and mark this project as
GUIfromProject Settings->General->This program is a GUI application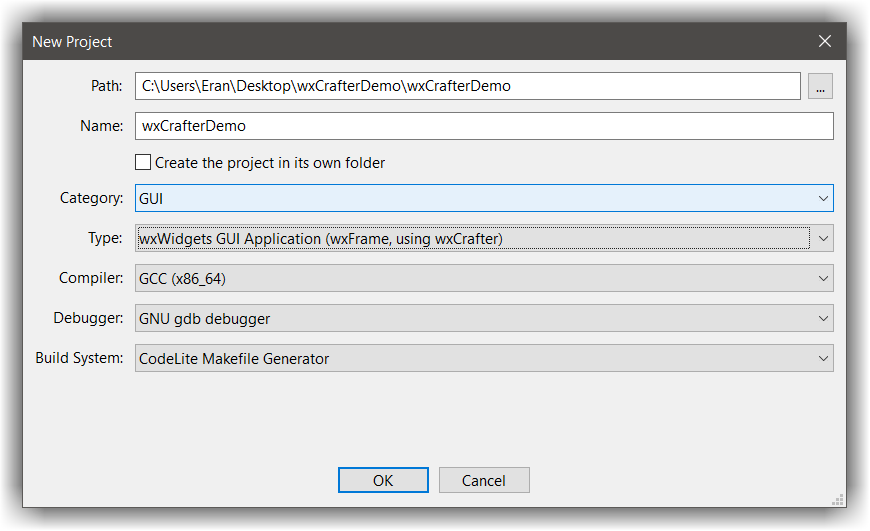
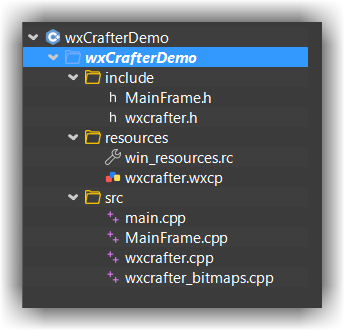
The following table gives a brief description about the generated files:
| File name | Description |
|---|---|
| main.cpp | The application code (derived from wxApp) |
| MainDialog.cpp / h | The inherited code for the dialog. This is where you should place your code |
| wxcrafter.cpp | The generated code by wxCrafter - you should not modify anything in this file as it will be overwritten by wxCrafter |
| wxcrafter_bitmaps.cpp | The bitmaps code. wxCrafter converts every bitmap selected in the designer into C++ code so they will be available during runtime |
| wxcrafter.wxcp | This is the wxCrafter designer file. Double-clicking it will open it in an editor |
- Double click on the
wxcrafter.wxcpfile, this will open the designer

Now, what we would like to do is:
- Add a button
- Connect an event to the button so when the button is clicked, we will be prompted with
Hello worldmessage
Since controls can only be placed inside sizers:
- Right click
m_mainPanelentry from the tree view and selectAdd Sizer→wxBoxSizer
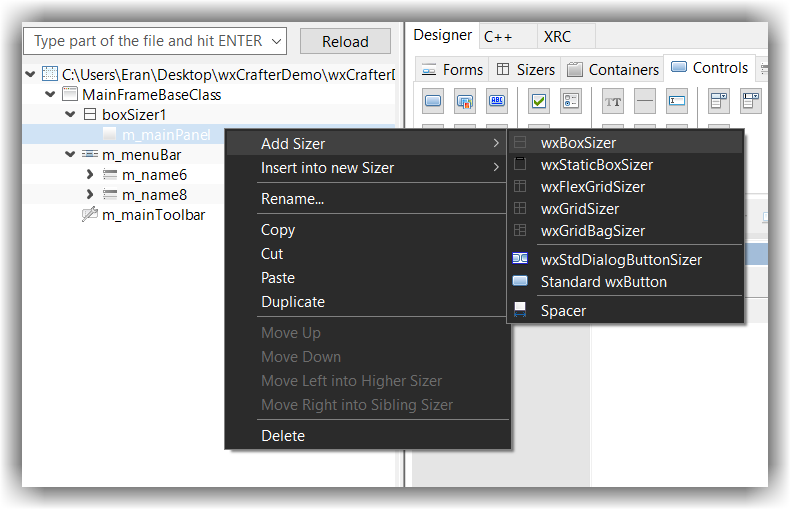
- Select the newly added sizer, this tells wxCrafter where to add new controls
- From the main view, Select the
Designer→Controlstab, and click on thewxButtonbutton

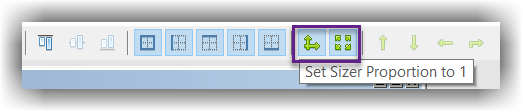
- Expand the button so it will capture the entire
m_mainPanelarea:- Select the button in the tree view (by simply clicking it)
- Clicking on both the
Set sizer proportion to 1andExpand Itembuttons (see screenshot below)
- Select the button and add function for the
wxEVT_COMMAND_BUTTON_CLICKEDnamedOnButtonClicked

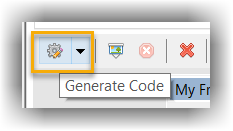
- Save everything and click on the grey cog button to generate the code
- Open the file
MainFrame.cppwithin CodeLite - You should see a new function added at the bottom with this code:
void MainFrame::OnButtonClicked(wxCommandEvent& event)
{
}
- Change it to
void MainFrame::OnButtonClicked(wxCommandEvent& event)
{
    wxUnusedVar(event);
    wxMessageBox("Hello World");
}
and add this include somewhere to the top of this file:
#include <wx/msgdlg.h>
- Build the project by clicking ++f7++
- Run the project ++ctrl+f5++
- Clicking on the button displays the
Hello Worldmessage box